Use geometric shapes in your card designs
- Rachel Designs

- Aug 4, 2025
- 4 min read
Hello again friends!
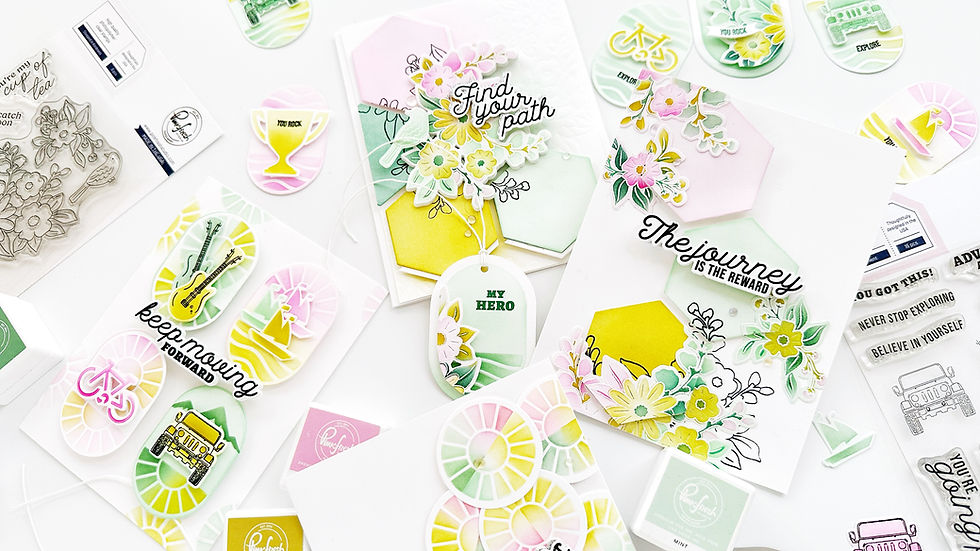
I'm back on the blog with a set of cards I made with Pinkfresh Studio August Challenge in mind.
This month's channel is about "Pattern Play": mixing, matching, and layering patterns; Stripes, florals, polka dots...so I thought the new Mark the moment set was perfect for today's projects having the challenge theme in mind.
The new Mark the moment stamp set is full of gorgeous sentiments and don't forget those tiny little images that can perfectly be used to add that special touch to your cards. The coordinating die set is a gem, once of those super versatile products that you can use over and over.
Let's get crafty and make some cards!
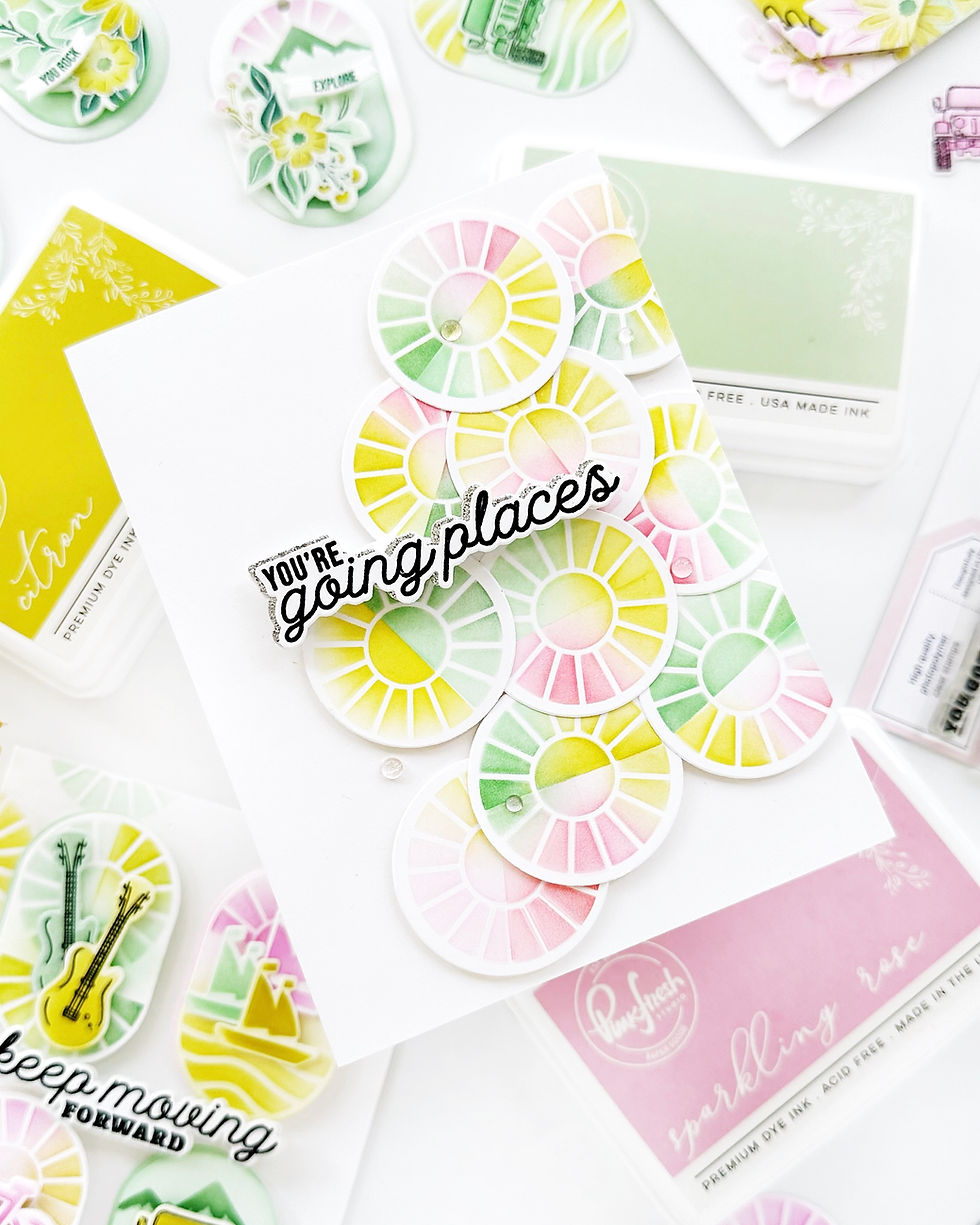
The moment I started creating with the Mark the moment stencil, I was hooked. It's amazing how many uses you can get out of this set.. Let's see how to recreate this card:
Cut out several circles and ovals out of white cardstock using the coordinating die of this set.
Use the coordinating stencil with the sunrays to color a bunch of circles. You just have to color the first half and the turn around the stencil, line it up, and color the lower part of the circle.
I used: Sparkling Rose, Begonia, Citron, Bay Leaf, Mint and Eucalyptus to keep the same look on all my cards but you can be really creative inking these up.
Arrange your circles onto an A2 panel. I created the shape you see in the pics but you can place them as you want. Secure them with Press & Seal, add double sided foam adhesive on the back and adhere it to your card base. Cut off the excess.
Stamp and cut our your sentiment and pop it up onto your card.

For my second project I used the small ovals from this set along with the images from the stamp set and the coordinating stencils:
Color your small ovals: use Sparkling rose on two of them and Mint on the other two ovals.
Have fun with your stencils and bring in some more color and interest creating shapes, sunsets, mountains. The coordinating stencils are great for this. I used different shapes not following the exact rules to create sunsets or waves. Just have fun creating these shapes. I used the same colors of card number 1 except Begonia: Sparkling Rose, Citron, Bay Leaf, Mint and Eucalyptus.
To add some extra interest I cut out an extra oval for each card, colored them with Sparkling Rose (2), Mint (1) and Eucalyptus (1) and adhered the to the main oval offsetting them a bit.
For the front panel, I just stenciled the sunset image randomly onto this panel with Mint, Sparkling Rose and Citron using the coordinating stencil.
Foam mount your ovals onto your front panel and adhere your sentiment.

The process to create this card is very similar to the previous one:
Color your Hexagons with Sparkling Rose (1), Eucalyptus (1) , Mint (2) and Citron (1).
Cut out two extra hexagons in half and adhere them on the back of three hexagons offsetting them a bit for some extra interest.
Place all five hexagons with repositionable tape onto an A2 printing paper arranging them as you prefer.
Use the Steeped in Kindness stamp set, and stamp it onto your hexagons with your stamping platform. You'll have to stamp it several times to make sure the image is crisp enough.
Remove your hexagons from your printing paper, add double sided foam adhesive and arrange them onto your card base. I previously dry emboss my front panel using the Steeped in kindness Press Plate.
White heat embossed the stepped in kindness stamp set and color it with the coordinating stencils using: Sparkling Rose, Citron, Bay Leaf, Spanish Mosh, Lush Forest, Mint and Eucalyptus. Cut his image out and foam mount it onto your hexagons.
Finally, adhere your sentiment. I used an extra layer of Glitter silver cardstock and adhered under my sentiment offsetting it a bit.

For my last card, I also used he Stepped in kindness stamp set along with three hexagons:
Color your Hexagons with Sparkling Rose, Mint and Citron.
Adhere these hexagons with repositionable tape onto your card base.
Use your stamping platform: Place the Steeped in Kindness stamp at the bottom right of this card base and stamp it with Detail Black ink. Stamp this image again at the top right of your card base. These stamped lines will be a guide to adhere your flowers.
Ink up an half of an 4 1/2 by 5 3/4 panel with Mint and the other half with Sparkling Rose. (This colored panel will add a special soft touch to your images) Apply some anti static powder and white heat emboss the Steeped in Kindness stamp onto this panel twice. Color these images with Sparkling Rose, Citron, Bay Leaf, Spanish Moss, Mint, Eucalyptus, Lush Forest and Evergreen and cut these flowers out with the coordinating die.
Adhere your white heat embossed flowers to your hexagons before removing them from your card base. Cut off the hanging parts of your flowers following the shape of the hexagons.
Foam mount your hexagons onto your card base aligning them with the pattern of your stamped images. Adhere the excess flowers we cut off from the hexagons directly to your card base. For the hexagon at the bottom I decided to offset a little bit my flowers so the black outlines on the card base were visible but that is optional.
Lastly, stamp your sentiment and foam mount it onto your card.
I encourage you to try these techniques and use your stencils in fun new ways. The Mark the moment set really packs a punch. I really love products like this set, that can be used over and over.
I hope you find these ideas inspiring and thank you so much for stopping by!
Raquel


Comments